
Jell-O Preparation: A Comprehensive Guide for 3oz Portions
Crafting delightful 3oz Jell-O portions involves precise measurements and techniques, ensuring optimal texture and flavor. Recipes often utilize 2oz water, alongside gelatin, and sugar for a perfect treat!
Understanding Jell-O Basics
Jell-O’s foundation lies in gelatin, a protein derived from collagen, responsible for its signature wobble and set. Understanding this is crucial for consistent 3oz portion results. The process begins with dissolving gelatin in hot liquid – typically water, but juice or even alcohol can be used, as seen in Vodka Sunrise Jell-O shots.
The key to successful Jell-O lies in proper gelatin bloom, where granules absorb liquid and swell. This is why water temperature is vital; boiling water fully dissolves the gelatin, while cold water requires more time and may leave undissolved particles. Sugar plays a significant role, not just for sweetness, but also in influencing the final texture – too much can create a softer set, while too little might result in a rubbery consistency.
For medical applications, like swallow tests post-stroke, Jell-O’s consistency is carefully controlled to assess aspiration risk. Modifying Jell-O for dysphagia involves adjusting thickness, highlighting its versatility beyond dessert.
The 3oz Serving Size: Why It Matters
The 3oz (approximately 90ml) serving size offers a balanced portion for both enjoyment and practical applications. In the context of Jell-O shots, it provides a controlled alcohol dosage, allowing for calculated content – crucial for responsible consumption. For medical uses, like 3oz water swallow tests following a stroke, this precise volume is vital for accurate aspiration assessments;
This size is also ideal for individual desserts, such as no-bake Jell-O pies, offering a satisfying treat without excessive sugar intake. Utilizing 3oz containers ensures consistent presentation and portion control. Recipes, like the Vodka Sunrise example, are often scaled to yield this specific serving size, simplifying preparation and ingredient calculations.
Furthermore, a 3oz portion is manageable for color blending experiments in digital art programs like Aseprite, mirroring the visual scale of pixel art projects.
Essential Ingredients for Standard Jell-O
Creating classic Jell-O necessitates a few key components. Primarily, gelatin provides the structural base, enabling the signature wobble and set. Sugar contributes sweetness and influences the final texture, balancing the gelatin’s inherent properties. Water, whether boiling or cold (depending on the recipe stage), acts as the solvent, dissolving the gelatin and sugar.
For flavored Jell-O, the powdered mix itself contains artificial flavors and coloring. When venturing into Jell-O shots, additions like vodka and grenadine become essential, altering the composition. Recipes may also incorporate fruit juices, such as orange juice, to complement the flavor profile.
Beyond the basics, ingredients like Cool Whip enhance dessert variations, while graham cracker crusts elevate Jell-O pies. Greek yogurt can be integrated for a creamy texture, requiring adjustments to liquid ratios.
Water Temperature: Boiling vs. Cold
Water temperature plays a crucial role in Jell-O preparation, impacting gelatin dissolution and the final product’s consistency. Boiling water is typically used initially to fully dissolve the gelatin granules, ensuring a smooth, lump-free mixture. This hot water facilitates the gelatin’s bloom, activating its gelling properties.
However, introducing cold water – or even ice water – is equally important. Adding cold liquid after the gelatin is dissolved helps to rapidly cool the mixture, initiating the setting process. This temperature contrast is vital for achieving the desired texture.
The ratio of boiling to cold water can influence density. For medical applications, like swallow tests, precise control over temperature and concentration is paramount to assess aspiration risk. Recipes often specify 2/3 cup boiling water and 1 cup ice water for a 3oz box.

Gelatin Bloom & Dissolving Process
Understanding gelatin bloom is fundamental to successful Jell-O creation. Gelatin bloom refers to the strength of the gelatin, measured in Bloom grams. Higher bloom numbers indicate stronger gelling capabilities. The dissolving process begins when gelatin granules absorb water, causing them to swell – this is the “bloom.”
Initially, granules appear to float, but with gentle stirring and sufficient heat (typically from boiling water), they hydrate and dissolve completely. Proper dissolution is critical; undissolved granules result in a grainy texture. The hot water breaks the bonds holding the gelatin structure together, allowing it to disperse evenly.
For 3oz portions, approximately 2 packets of gelatin are commonly used. Ensuring complete dissolution before adding other ingredients, like juice or alcohol, is key. A special dense liquid with jelly viscosity is achieved through this careful process.
Sugar’s Role in Jell-O Texture
Sugar isn’t merely for sweetness in Jell-O; it profoundly impacts the final texture. Beyond flavor, sugar interferes with the gelatin’s ability to form a firm gel. The more sugar added, the softer the set will be. This is because sugar molecules compete with gelatin for water molecules, hindering the network formation essential for gelling.
Recipes often call for a tablespoon of sugar per 3oz portion, balancing sweetness and structural integrity. Sugar-free Jell-O utilizes artificial sweeteners, which don’t have the same textural impact as sucrose, often resulting in a firmer set.
Adjusting sugar levels allows for customization – less sugar yields a firmer Jell-O, while more creates a softer, more delicate consistency. Careful consideration of sugar content is vital, especially when modifying recipes or creating layered desserts.
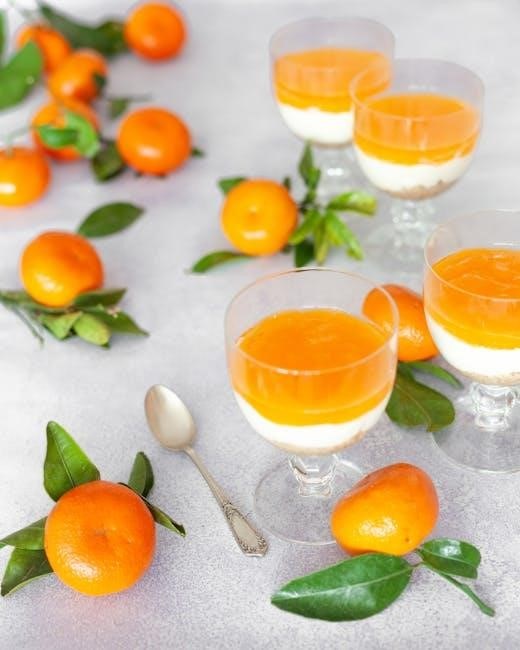
Jell-O Shot Recipes (3oz) ౼ Vodka Sunrise Example
For a vibrant 3oz Vodka Sunrise Jell-O shot, begin with 1 ½ oz of vodka and 2oz of orange juice, combined with 2 packets of gelatin dissolved in 2oz of water. A tablespoon of sugar enhances the flavor profile. Grenadine, approximately 2oz, is carefully layered after the gelatin mixture partially sets, creating the “sunrise” effect.
First, dissolve the gelatin in boiling water, then stir in the vodka, orange juice, and sugar until fully combined. Pour into 3oz shot glasses, filling them about halfway. Refrigerate for approximately 30-60 minutes, until slightly firm but not fully set.
Gently pour the grenadine over the partially set Jell-O, allowing it to settle and create a beautiful layered appearance. Return to the refrigerator for at least two hours, or until completely firm. Enjoy responsibly!
Calculating Alcohol Content in Jell-O Shots
Determining the alcohol content in 3oz Jell-O shots requires careful calculation, considering the volume of alcohol used and the total volume of the shot. A typical recipe, like the Vodka Sunrise, utilizes 1 ½ oz of vodka within a 3oz serving, resulting in a significant alcohol percentage.
To calculate, divide the volume of alcohol (e.g., 1.5oz) by the total volume of the shot (3oz). This yields 0.5, or 50% alcohol by volume (ABV). However, gelatin and other ingredients slightly increase the total volume, subtly reducing the ABV.
It’s crucial to remember that perceived strength can be deceptive due to the sweetness and texture of Jell-O. Always consume responsibly and be mindful of the alcohol content, especially when serving to others. Accurate measurement is key to responsible enjoyment!
Layering Flavors in Jell-O Shots
Creating visually appealing and flavorful 3oz Jell-O shots often involves layering different colors and tastes. This technique enhances both the presentation and the overall experience. Begin by preparing the base layer, allowing it to partially set before adding the subsequent layer.
For a Vodka Sunrise effect, pour a layer of orange Jell-O, let it firm slightly, then carefully add a layer of grenadine-infused Jell-O. The density difference helps maintain distinct layers. Ensure each layer is cool but not fully set to prevent mixing.
Experiment with complementary flavors like strawberry and lime, or raspberry and lemon. Patience is key; allow each layer sufficient time to solidify before proceeding. Layering not only adds visual interest but also introduces a dynamic flavor profile with each spoonful!
Jell-O & Dairy Combinations (Greek Yogurt)
Combining Jell-O with dairy, particularly Greek yogurt, creates a creamy and protein-rich dessert, transforming the classic treat into something more substantial. Utilizing 10 2/3 oz of plain Greek yogurt alongside Jell-O introduces a tangy counterpoint to the sweetness.
When incorporating dairy, gently fold the yogurt into the prepared Jell-O mixture after it has slightly cooled but before it fully sets. This prevents the heat from curdling the yogurt. A 3oz serving can benefit from approximately 1/3 oz of sugar-free strawberry Jell-O for a delightful flavor combination.
The yogurt adds a luxurious texture and nutritional boost. Ensure thorough mixing for a homogenous consistency. Chilling is crucial to allow the mixture to set properly, resulting in a smooth and satisfying dessert!
Achieving a Smooth Texture with Dairy
Successfully integrating dairy into Jell-O for a flawlessly smooth texture requires careful attention to temperature and mixing techniques. Avoid adding hot Jell-O directly to dairy, as this can cause separation or curdling, compromising the final product’s consistency.
Allow the Jell-O to cool slightly – it should be lukewarm, not boiling – before gently folding in the dairy component, like Greek yogurt. This gradual incorporation prevents thermal shock. A slow, deliberate mixing action is key; avoid vigorous stirring, which can introduce air bubbles and disrupt the setting process.
For a 3oz portion, start with a small amount of dairy and gradually increase, ensuring each addition is fully blended before adding more. Chilling the mixture for an adequate period – typically at least four hours – is essential for achieving a firm, yet velvety, texture.
Jell-O as a Thickening Agent (Drinking Applications)
Utilizing Jell-O to modify liquid consistency for easier consumption, particularly in medical contexts, demands precision. Dissolving Jell-O in water creates a specialized, dense liquid with a jelly-like viscosity, ideal for individuals with swallowing difficulties (dysphagia). A 3oz water swallow test, following a stroke, utilizes this principle.
To achieve the desired thickness, carefully control the Jell-O-to-water ratio. A small amount of Jell-O can significantly alter the liquid’s flow. Ensure complete dissolution to avoid clumps. Lukewarm water facilitates quicker dissolving, but avoid boiling, which can degrade the gelatin’s thickening properties.
This technique isn’t limited to water; Jell-O can thicken juices or other beverages. Always assess the final consistency to ensure it’s appropriate for the individual’s needs, balancing thickness with palatability.
Jell-O Pie Recipes (3-Ingredient No-Bake)

Creating a simple, no-bake Jell-O pie is remarkably easy, requiring only three ingredients for a delightful dessert. A classic recipe starts with a box of Cherry Jell-O (3oz size), requiring 2/3 cup of boiling water and 1 cup of ice water for initial preparation. This forms the flavorful base of the pie.
The second key ingredient is Cool Whip, or a similar whipped topping (approximately 8oz), which provides a light and airy texture. Gently fold the prepared Jell-O into the Cool Whip, ensuring a homogenous mixture. Finally, a pre-made graham cracker crust provides the structural foundation.
Pour the Jell-O mixture into the crust and refrigerate for several hours, allowing it to set completely. This 3-ingredient recipe delivers a quick and satisfying treat, perfect for any occasion!
Cool Whip & Jell-O: A Classic Pairing
The combination of Cool Whip and Jell-O represents a timeless dessert synergy, celebrated for its simplicity and delightful texture. This pairing elevates the standard Jell-O experience, transforming it into a creamy, airy indulgence. Recipes frequently utilize an 8oz container of Cool Whip alongside a 3oz box of Jell-O.
The process involves preparing the Jell-O according to package directions – typically dissolving the gelatin in boiling water, then adding cold water. Once slightly cooled, the Jell-O is gently folded into the Cool Whip. This incorporation creates a light and fluffy consistency, contrasting beautifully with the Jell-O’s inherent firmness.
This mixture can be enjoyed directly, molded into shapes, or used as a filling for pies and other desserts. The Cool Whip’s sweetness complements the Jell-O’s fruity flavors, resulting in a universally appealing treat.
Graham Cracker Crusts for Jell-O Pies
Employing a graham cracker crust significantly enhances the presentation and flavor profile of Jell-O pies, providing a textural contrast to the smooth, wobbly filling. A premade graham cracker crust serves as a convenient base for these no-bake desserts, perfectly complementing the 3oz Jell-O portion.
The preparation is straightforward: simply pour the prepared Jell-O mixture – created by dissolving gelatin and adding water – into the graham cracker crust. Ensure the Jell-O has cooled slightly before pouring to prevent melting or compromising the crust’s integrity.
Refrigerate the pie for several hours, or until the Jell-O is fully set. The crust provides a sturdy foundation and a delightful buttery, slightly sweet counterpoint to the fruity Jell-O. This combination transforms a simple Jell-O dessert into an elegant and satisfying treat, ideal for any occasion.

Jell-O for Medical Applications (Swallow Tests)
Jell-O’s consistent texture makes it invaluable in medical settings, particularly for swallow tests assessing dysphagia – difficulty swallowing. A 3-oz water swallow test, utilizing Jell-O, helps clinicians evaluate aspiration risk following conditions like stroke. The standardized viscosity allows for observation of how effectively a patient can manage different consistencies.
Specifically, a 3oz portion of Jell-O provides a controlled medium to assess the mechanics of swallowing. Medical professionals observe if the patient can safely swallow the Jell-O without any signs of food or liquid entering the airway. This assessment is crucial in determining appropriate dietary modifications.
Modifying Jell-O’s consistency – thickening or thinning – allows for tailored testing based on individual patient needs. Careful observation during the swallow test guides treatment plans to minimize aspiration risk and improve swallowing function.
Jell-O Consistency & Aspiration Risk
Understanding the relationship between Jell-O consistency and aspiration risk is paramount in medical applications. Aspiration, the entry of food or liquid into the airway, poses a serious threat, especially for individuals with dysphagia. The viscosity of Jell-O directly impacts its swallowability and, consequently, the risk of aspiration.
A 3oz portion provides a standardized volume for assessment. Too thin a consistency may flow too easily, increasing the chance of entering the airway. Conversely, excessively thick Jell-O can be difficult to swallow, potentially leading to residue buildup and aspiration.
Healthcare professionals carefully evaluate how a patient manages the 3oz Jell-O bolus, observing for signs of coughing, choking, or wet vocal quality – indicators of potential aspiration. Adjusting Jell-O’s thickness, through additives, allows clinicians to determine the safest and most effective consistency for each patient, minimizing aspiration risk and maximizing safe oral intake.
Modifying Jell-O for Dysphagia
Adapting Jell-O’s texture is crucial when catering to individuals with dysphagia, a swallowing disorder. Standard Jell-O may not be safe for those with compromised swallowing function, necessitating modifications to reduce aspiration risk. Utilizing a 3oz portion allows for controlled assessment and adjustment.
Thickening agents, such as commercially available powders or even pureed fruits, can increase Jell-O’s viscosity. These adjustments create a more cohesive bolus, reducing the likelihood of liquid escaping into the airway during swallowing. Conversely, thinning agents, like additional water, can be used for individuals who struggle with thicker consistencies.
Speech-language pathologists play a vital role in determining the appropriate Jell-O consistency for each patient. They assess swallowing ability and recommend specific modifications, ensuring safe and effective oral intake. Careful monitoring and individualized adjustments are key to maximizing quality of life for those with dysphagia.
Color Blending Techniques in Jell-O (Aseprite Relevance ─ Visual Representation)
Achieving visually appealing Jell-O colors, even in 3oz portions, mirrors the principles of digital art, particularly pixel art software like Aseprite. Just as Aseprite artists utilize palettes and layering, Jell-O creation benefits from understanding color interaction.
Blending Jell-O colors isn’t about mixing paints; it’s about layering. Creating a sunrise effect, for example, involves allowing layers of different colored Jell-O to partially set before adding the next. This mimics Aseprite’s layering system, where each layer contributes to the final image.
Aseprite’s “onion-skinning” feature, showing previous and next frames, parallels visualizing how layered Jell-O colors will interact. Palette changes in Aseprite find a parallel in using different Jell-O flavors to achieve desired hues. Experimentation is key, mirroring the iterative process of digital art. Visualizing the final result, like a digital canvas, enhances the creative process.
Palette Changes & Jell-O Color Schemes
Similar to an artist selecting a palette in Aseprite, choosing Jell-O flavors defines your color scheme for 3oz portions. Aseprite’s palette replacement feature mirrors how you can shift the overall tone of Jell-O creations by swapping flavors.

Consider complementary color schemes – orange and blue, for instance – using orange Jell-O and a blueberry layer. Analogous schemes, like shades of red (cherry, strawberry, raspberry), create harmonious blends. Monochromatic schemes, using varying intensities of a single color, offer subtle elegance.
Just as Aseprite allows global palette adjustments, you can influence the overall color of Jell-O shots with grenadine or orange juice. Experimenting with different combinations, like a “Vodka Sunrise” scheme, yields visually striking results. Remember, careful flavor selection is akin to curating a digital palette for a vibrant, appealing presentation.
Community Resources for Jell-O & Digital Art (Aseprite Forum)
Online communities offer invaluable support for both Jell-O enthusiasts and Aseprite users. The Aseprite forum (community.aseprite.org) provides a space to share techniques, troubleshoot issues, and find inspiration – mirroring how recipe-sharing sites foster Jell-O creativity.
These platforms allow for collaborative learning; users discuss color blending, layering, and presentation, much like sharing 3oz Jell-O shot recipes. Seeking advice on achieving specific textures or troubleshooting gelatin setting parallels asking for help with pixel art techniques.
Reddit also hosts active communities dedicated to both Jell-O and Aseprite. Engaging with these groups provides access to a wealth of knowledge, from advanced Jell-O shot formulations to Aseprite’s onion-skinning features. Remember to practice good internet etiquette when sharing and seeking advice within these spaces.
Internet Etiquette & Recipe Sharing
Sharing Jell-O recipes, especially those involving alcohol like 3oz Jell-O shots, requires responsible online behavior. Always clearly label alcoholic creations and provide accurate alcohol content estimations, prioritizing safety and legal compliance.
Respect copyright and give credit when adapting recipes found online. Constructive criticism is welcome, but maintain a polite and respectful tone in all interactions. Avoid plagiarism and always acknowledge the original source of inspiration.
When posting, consider clarity and detail; specify ingredient brands, water temperatures, and setting times for optimal results. Engaging in thoughtful discussions and offering helpful advice fosters a positive community. Remember, a collaborative spirit enhances the enjoyment of Jell-O creation for everyone involved!